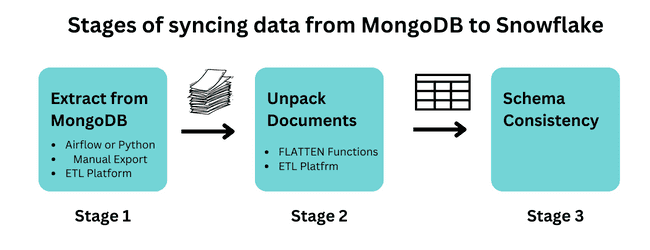
When replicating data from a no-SQL source like MongoDB to Snowflake, there are three major stages of the pipeline to plan through:
- Selecting a means of moving the data (e.g. MongoDB and snowflake connectors, or manual backfill)
- Normalizing nested documents to a relational format
- Ensuring continual schema consistency
Some of these choices will be less expensive, but will require manual work downstream to prepare the data for use. Estuary is one such option for automating all three stages, including automated unpacking of 1,000 fields. Let’s explore each stage and option in more depth, specific to MongoDB to Snowflake.
How to sync MongoDB with Snowflake
In another blog post, we explored a few different methods for syncing MongoDB with Snowflake. Except for one-offs or if using an ETL platform, the most common architectural pattern is to stage the documents in S3/GCP/Azure for ingestion into Snowflake. Depending on your stack, this can take many different forms. At a high-level, and without blowing a bunch of SEO noise your way, your choices include:
- Manual export a CSV from MongoDB using the UI or using ‘mongoexport’ in the CLI
- If using Airflow, use operators MongoToS3Operator and SnowflakeOperator
- Use an ETL or ELT platform like Estuary, Fivetran, Rivery or Airbyte
- Copy the MongoDB data to staging in S3/GCP/Azure, and then load into Snowflake from cloud storage using ‘COPY INTO’
Which is the right method for you will depend on frequency you need to sync data from MongoDB to Snowflake (e.g. one-time, hourly, or millisecond updates), budget, comfort with using orchestration tools like Airflow and Python, and how complex and with what velocity your documents in MongoDB are evolving.
| MongoDB to Snowflake Sync Method | Pro’s | Con’s |
| Manual Export & Load | Inexpensive and quick | Updates are one-off and not incremental. Documents not unpacked. |
| Open-Source tools to stage MongoDB data in cloud storage (e.g. Airflow, Python, Nifi, DMS to S3/GCP/Azure) | Low budget | Requires manually building, maintaining, and unpacking the pipeline as Mongo changes |
| Estuary | Real-time incremental sync within <100ms using no-code. | If not using open-source or have more than 10GB/mo, the managed product is paid at $1/GB. |
| Fivetran, Rivery, Airbyte | No-code incremental sync | Do not automatically unpack beyond 1 layer. Users report some issues with certain characters. Batch loads. |
For those with complex and evolving schemas, and looking for real-time syncs of change data from MongoDB to Snowflake, Estuary may be the right fit. Estuary is a real-time CDC & ETL platform with connectors for MongoDB and Snowflake. Beyond being able to use no-code connectors to sync the data end to end in <100ms, Estuary streamlines the sync by automatically and continuously flattening and unpacking your nested objects.
Say you’ve chosen a path for how you will sync the data, next you must determine your method for how you will flatten the MongoDB data. Some setups will have you processing the data entirely at the consumer/data warehouse level, while others will help save you some work with automatic unpacking.
How to normalize MongoDB data for Snowflake
As we mentioned before, MongoDB is a no-SQL database and will require special attention during migration and replication to a RDBMS like Snowflake. At the heart of every MongoDB implementation is the document. A MongoDB document is a JSON-esque data type made of up key-value pairs that can be nested many layers down (up to 100!), including containing other documents or arrays and lists of documents.
Naturally, this is not a format particularly friendly for analytics or data science use cases as joins and running advanced queries will be both complicated and expensive. But how to optimally flatten the nested objects to use the MongoDB data in Snowflake? While I’m personally partial to a large machine like a steamroller for flattening, more sophisticated engineers may prefer more technical methods.
When choosing to flatten the MongoDB data for Snowflake, you have a couple options:
1) Use Snowflake functions like FLATTEN to create normalized views to query from
2) Use an ETL / ELT platform with automated flattening of objects
The first method is well described in this article. Note that the author uses Fivetran to move the data, and no, that doesn’t make him a bad person, but it does mean that they are a) spending a lot of money and b) are only able to automatically unpack at one-level (per Fivetran docs). The author unpacks the rest manually at the Snowflake level. Beyond that, the author does an excellent job at describing the relevant flattening and de-nesting functions.
Alternatively, Estuary will enable for far richer functionality in unpacking MongoDB data for syncing to Snowflake. Unlike Fivetran, which will unpack the nested documents at one level, Estuary enables data engineers to unpack MongoDB objects as far or as little as they require. Estuary will automatically unpack up to 1000 fields.
How does this work and how much control does the data engineer have when flattening?
Let’s unpack it. No pun intended :)
When a source, MongoDB CDC in this instance, is connected to Estuary, Estuary will load all historical data and start listening for change events. The historical data and all change events are then continuously replicated to a cloud storage bucket as regular JSON files. On configuration within Estuary, the following process will automatically take place to being unpacking the MongoDB documents:
1) The Estuary platform begins by introspecting all fields at the top level
2) As long as there are < 1,000 fields, this process will continue to the second level, then third, and so on
3) This continues until all fields have been flattened (as long as <1K. We stop at 1K as some destinations have hard limits on the number of fields they will accept)
4) By default, Estuary includes fields where possible and not objects to make it easier to query data for analytics
5) This process happens on every single document – if a new field is found, Estuary will automatically alter the schema of the table on the destination side and add it the first time that field is seen
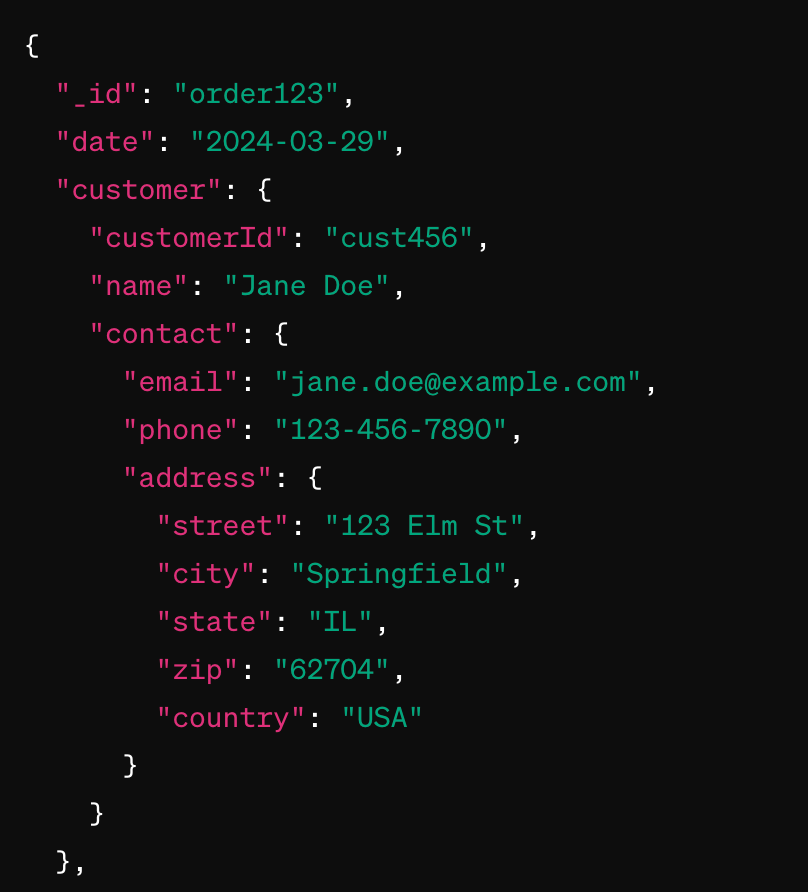
Let’s consider an example of an eCommerce store using MongoDB with the following 5 layer deep document structure, and what this means.
In this example, if using Estuary, we’ll automatically unpack “order123” to the address fields for easy load into a relational database like Snowflake. You’ll be able to pack or unpack this MongoDB data as you wish and define the read and write schema. By comparison, if using a platform with more limited unpacking, you may be unable to automatically unpack beyond the date field, and will have to flatten to access information about the customer once in the data warehouse.
Using a platform with automated unpacking will save time and simplify preparing the unstructured MongoDB data for use within Snowflake.
How to automate schema evolution
The schema of a no-SQL database like MongoDB is expected to change quite often. Manually keeping source and destination schemas in sync can be a job with a high level of upkeep.
The low-fi method to ensure that both source and destination are in sync is a full refresh of data on every sync. This ensures that any new documents and fields will be delivered to the Snowflake destination. Estuary offers data teams a more nuanced approach to schema evolution.
Instead of just full refreshes, Estuary enables data teams to choose their own path. With Estuary, you can chose to halt the MongoDB to Snowflake pipeline with data contracts, have the system automatically update the Snowflake schema with the new MongoDB schema, or Estuary will create a new table in Snowflake to keep old and new schemas distinct. More technical details are below and are found in our docs.
Evolutions can prevent errors resulting from mismatched specs in two ways:
- Materialize data to a new resource in the endpoint system: The evolution updates the affected materialization bindings to increment their backfill counter, which causes the materialization to re-create the resource (database table, for example) and backfill it from the beginning.
This is a simpler change, and how evolutions work in most cases. - Re-create the Flow collection with a new name: The evolution creates a completely new collection with numerical suffix, such as _v2. This collection starts out empty and backfills from the source. The evolution also updates all captures and materializations that reference the old collection to instead reference the new collection, and increments their backfill counters.
This is a more complicated change, and evolutions only work this way when necessary: when the collection key or logical partitioning changes.
In either case, the names of the destination resources will remain the same. For example, a materialization to Postgres would drop and re-create the affected tables with the same names they had previously.
How to sync MongoDB to Snowflake in real-time with Estuary
As discussed earlier in the article, you have a few options across open-source, cloud native tooling, and a selection of ETL platforms for syncing data from MongoDB to Snowflake.
I’m here to remind you that I respect your choice for you stack, whatever your choice may be. If you go the route of using an ETL or ELT platform, note that amongst the potential free or paid platforms, Estuary will have a few unique benefits for this sync. Namely:
- Change Data is streamed from MongoDB to Snowflake in <100ms
- Nested Documents are automatically unpacked up to 1K fields
- Data will automatically be staged continuously in your cloud storage for you
- You can control how schemas are evolved and matched between source and destination
- Transform and join data in-flight, or load as-is with ELT
- Forever free 10gb/mo/change data - just $1/gb thereafter
To get started with Estuary to sync data from MongoDB to Snowflake:
1) Create an account at https://dashboard.estuary.dev/register
2) Permission Estuary read-access to your MongoDB database by updating security
3) Create your Capture by entering credentials
4) Connect your Snowflake account
Related articles:


