In today’s highly competitive, fast-paced digital environment, being able to harness real-time data has become crucial for businesses looking to gain a competitive edge.
The growth of modern data streaming technologies has continued to make it easier for organizations to capture and understand customer behavior, optimize operations, and make proactive decisions. One great example is using Amazon Kinesis to stream data into Snowflake.
The combination provides you with real-time analytics that give you immediate insights into your operations, customer behavior, and market trends. It also allows efficient handling of large volumes of data, ensuring that data lakes and data warehouses always have the latest information.
This guide will teach you how to stream data from Kinesis to Snowflake.
What Is Kinesis? An Overview
Amazon Kinesis is an AWS service designed to handle real-time streaming of data at scale. It supports the continuous collection and streaming of data, like video, audio, website clickstreams, and IoT telemetry data. With the collection, processing, and analysis of streaming data, you can gain timely insights for improved decision-making.
One of the key solutions offered by Kinesis is the Amazon Kinesis Firehose, a fully managed service for loading streaming data into data lakes, data warehouses, data stores, and other analytics backends. Firehose can capture, transform, and load data into Amazon Redshift, Amazon S3, Amazon Elasticsearch, and Splunk.
Kinesis offers developers the ability to build applications that can consume and process data from multiple sources simultaneously. The platform supports several use cases, including real-time analytics, log and event data processing, and fraud detection in financial transactions.
What Is Snowflake? An Overview
Snowflake, a cloud-based data warehousing platform, is a fully managed service built on top of major cloud providers like AWS, Azure, and Google Cloud Platform. As a result, Snowflake can easily leverage cloud providers’ robust, scalable infrastructure.
The architecture of Snowflake consists of three layers — storage, compute, and cloud services — each of which is independently scalable. Being able to scale storage and compute separately ensures efficient resource utilization. It also allows you to dynamically resize compute resources to match workload demands without any downtime or performance degradation.
Among the many impressive features of Snowflake is its zero-copy cloning. This feature provides an easy and quick way to create a copy of any table, schema, or entire database without incurring any additional costs. The underlying storage of the copy is shared with the original object. Yet the cloned and original objects are independent of each other; any changes done to either of the objects won’t impact the other.
Methods to Stream Data from Kinesis to Snowflake
To stream real-time data from Amazon Kinesis to Snowflake, you can use Kinesis Data Firehose (the AWS ETL service) or SaaS tools like Estuary Flow.
Let’s look into the details of these methods to help you understand which is a more suitable choice for your needs.
Method #1: Using AWS Services to Stream Kinesis to Snowflake
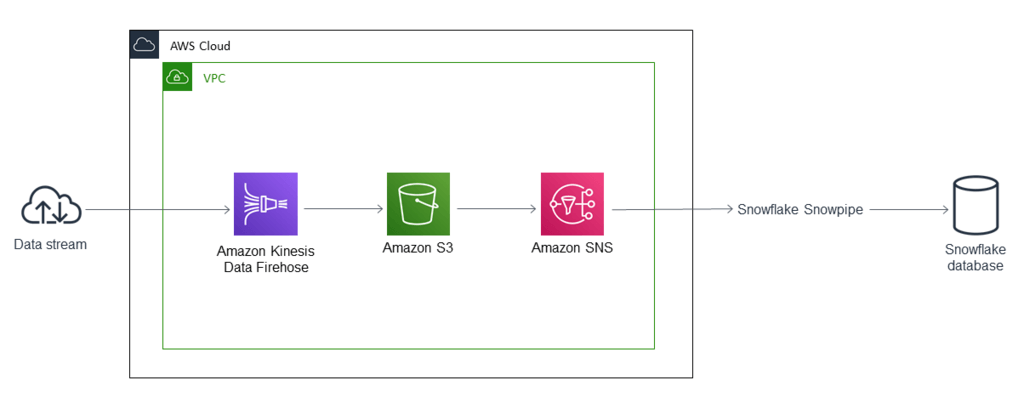
This method uses the AWS ETL service — Kinesis Data Firehose — to process a continuous stream of data and load it into a Snowflake database. It involves using:
- Amazon Kinesis Data Firehose to deliver the data to Amazon S3,
- Amazon Simple Notification Service (Amazon SNS) to send notifications when new data is received, and
- Snowflake Snowpipe to load the data into a Snowflake database.
If you’re interested in trying this method, you need to meet the prerequisites first:
- An active AWS account.
- A data source that constantly sends data to a Firehose delivery stream.
- An existing S3 bucket to receive data from the Firehose delivery stream.
- An active Snowflake account.
Once you’ve taken care of the prerequisites, follow these steps to start streaming data.
Step 1: Setting Up Amazon Kinesis Firehose
- Log into the AWS Management Console.
- Navigate to the Kinesis service and select Create Delivery Stream.
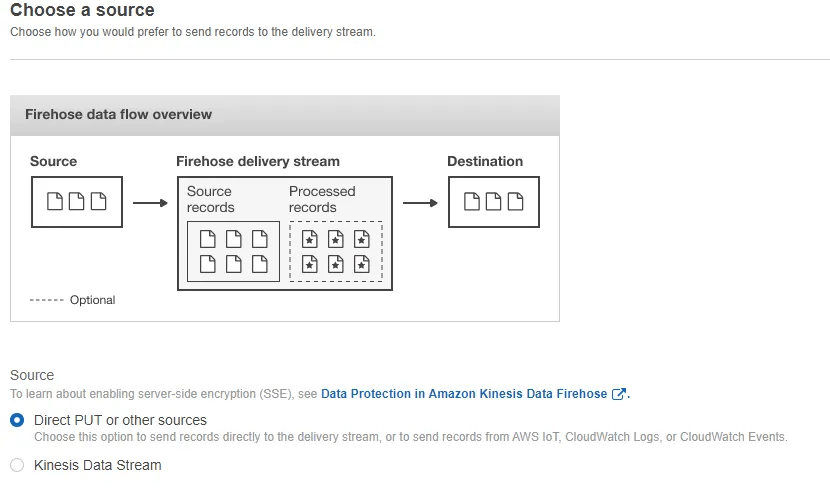
- Choose a source for your stream. The two options for this include:
- Direct PUT or other sources (suitable for sending records directly to the delivery stream, and you don’t have high volume throughput events)
- Kinesis Data Stream (suitable if you have high volume throughput events)
- Configure the delivery stream. Start by providing a Delivery stream name and configuring other settings such as Data Transformation, Record format conversion, and Source Record Backup.
Optional: Add some transformations if needed. If you prefer untampered data in raw format transported into Snowflake, you can skip this step.
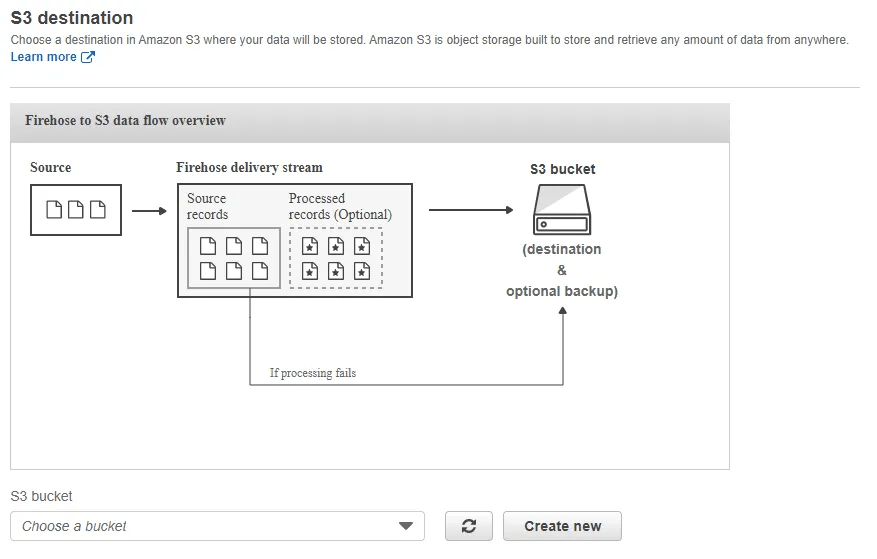
- Select the destination as Amazon S3; Kinesis Data Firehose currently doesn’t support direct integration with Snowflake.
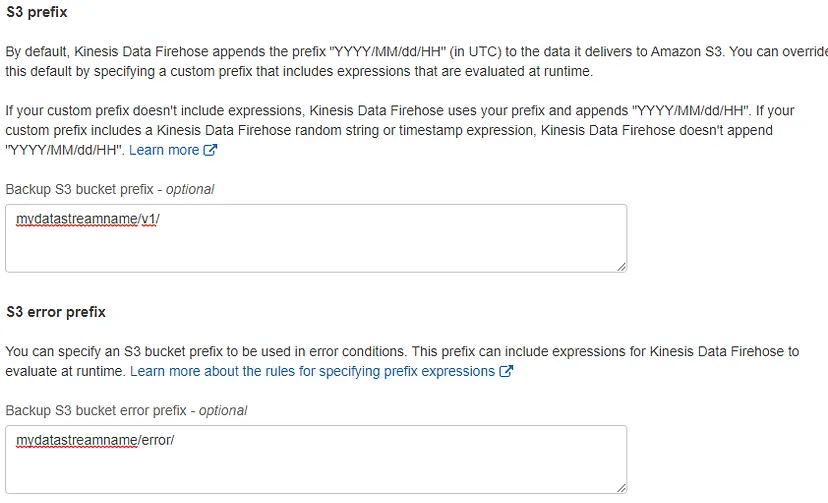
- Configure the S3 bucket and prefix where the data will be stored.
- Set up the interval of data deliveries written from AWS Kinesis Firehose to S3. You can use the buffering options—Buffer size and Buffer interval—for this purpose.
Whenever either of your buffering options is satisfied, a file will be written with all the buffered content to your S3 destination.
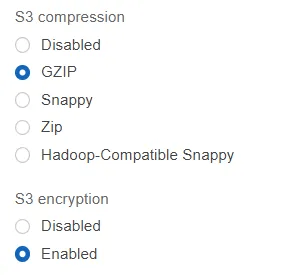
- Optional: Enable compression or encryption for your data.
Step 2: Setting up Snowflake
- Create a stage in Snowflake to reference the S3 bucket where Kinesis Firehose stores data.
- Next, define a file format in Snowflake to match the format of the data in S3. Here’s a sample code that should give you a better idea about how to create a stage and define a file format.
plaintextCREATE STAGE my_s3_stage
  STORAGE_INTEGRATION = s3_int
  URL = 's3://mybucket/encrypted_files/'
  FILE_FORMAT = my_csv_format;
This example uses SQL to create an external stage named my_s3_stage that references an S3 bucket named mybucket. A storage integration is a Snowflake object that stores a generated IAM user for your S3 cloud storage. The stage references a file format object named my_csv_format, which describes the data in the files stored in the bucket path.
- Finally, create a table in Snowflake to load the streamed data.
Step 3: Setting up Snowpipe
Snowpipe is a serverless data ingestion service that automates loading data into Snowflake from sources, including S3. It supports continuous, real-time, or batch loading. Snowpipe enables loading data from files as soon as they’re available in a stage.
Here’s how it works: S3 uses Amazon SQS (Simple Queue Service) notifications to trigger Snowpipe data loads automatically.
If you’re interested in going this route, follow these steps to set up Snowpipe:
- In Snowflake, create a Snowpipe that points to the stage you created.
- Use the COPY INTO statement to load data into the table. Ensure it’s compatible with the file format of the data.
- Configure Snowpipe with the AUTO_INGEST = true parameter to automatically ingest files as soon as they arrive in S3. Typically, this is done by setting up an Amazon SNS topic or an SQS queue that notifies Snowpipe of new files.
Here’s an example code that creates a pipe named mypipe, which loads data from files staged in the mystage stage into the mytable table.
plaintextcreate pipe snowpipe_db.public.mypipe auto_ingest=true as
  copy into snowpipe_db.public.mytable
  from @snowpipe_db.public.mystage
  file_format = (type = 'JSON');
This completes the entire process of streaming data from Kinesis to Snowflake using Kinesis Data Firehose and Snowflake’s Snowpipe.
If you opt for this method to stream data from Kinesis to Snowflake, you just need to be aware of the associated challenges:
- Latency. While this setup is designed for near-real-time processing, there may be a noticeable latency between data being available in Kinesis and its availability in Snowflake. This may impact use cases requiring real-time analytics.
- No support for direct integration. Firehose doesn’t support direct integration with Snowflake; it uses Amazon S3 as an intermediary. This adds an extra step in the data pipeline, causing increased complexity and latency.
Method #2: Using SaaS Alternatives like Estuary Flow to Stream Data from Kinesis to Snowflake
If you’re looking for a seamless, scalable, and real-time solution for the Kinesis to Snowflake integration, a SaaS tool like Estuary Flow might be just what you need. Flow is a real-time data integration platform that simplifies the process of setting up and managing data streams.
Here are some of the features that make Estuary a suitable choice:
- Real-time streaming. Estuary Flow pipelines are optimized for real-time data streaming and achieve lower latency. This is beneficial for applications that require near-real-time data analysis.
- Scalability. Estuary Flow is designed to automatically scale to handle large-scale data streams efficiently. This helps accommodate fluctuating data volumes, which is essential for high-throughput environments.
- Simplified setup process. Estuary offers an intuitive interface and pre-built connectors for the effortless setup of integration pipelines. It’s appropriate for users with varying levels of technical expertise.
Consider registering for a free Estuary account if you don’t already have one. After you sign in to your account, follow these steps to start streaming data.
Step 1: Configure Kinesis as the Source
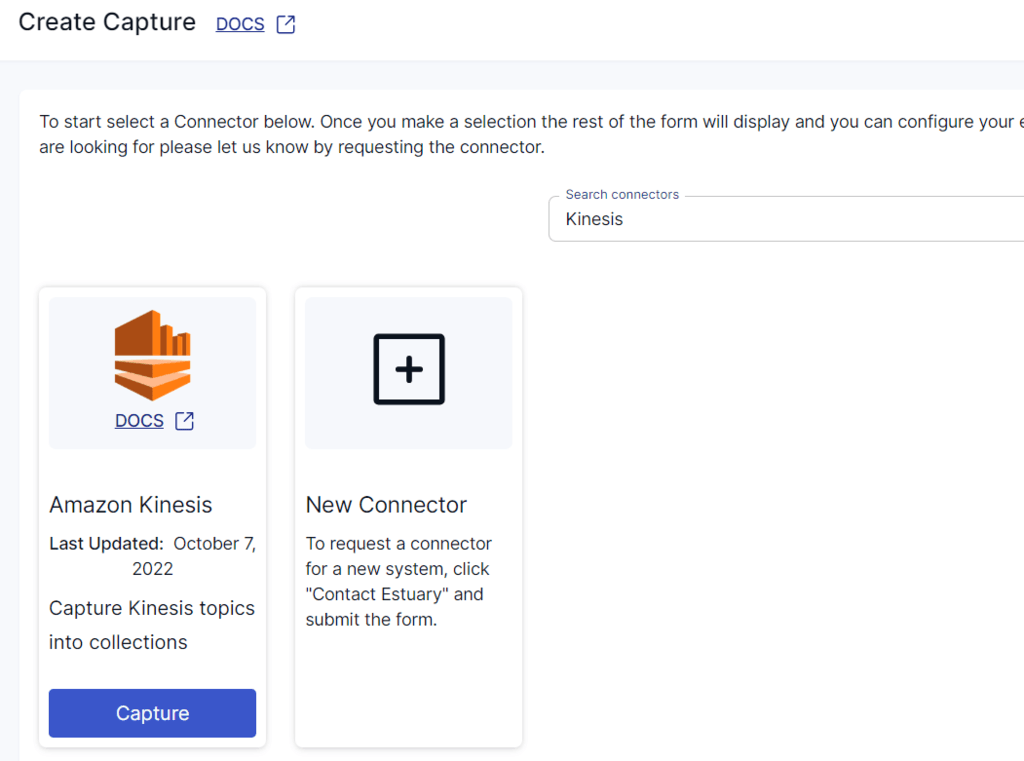
To start the process of configuring Amazon Kinesis as the data source, click Sources on the left-side pane of the Estuary dashboard. Then, click the + NEW CAPTURE button and search for the Kinesis connector using the Search connectors box. When you see the connector in the search results, click the Capture button.
Note: There are a few prerequisites you must meet before you start using the connector.
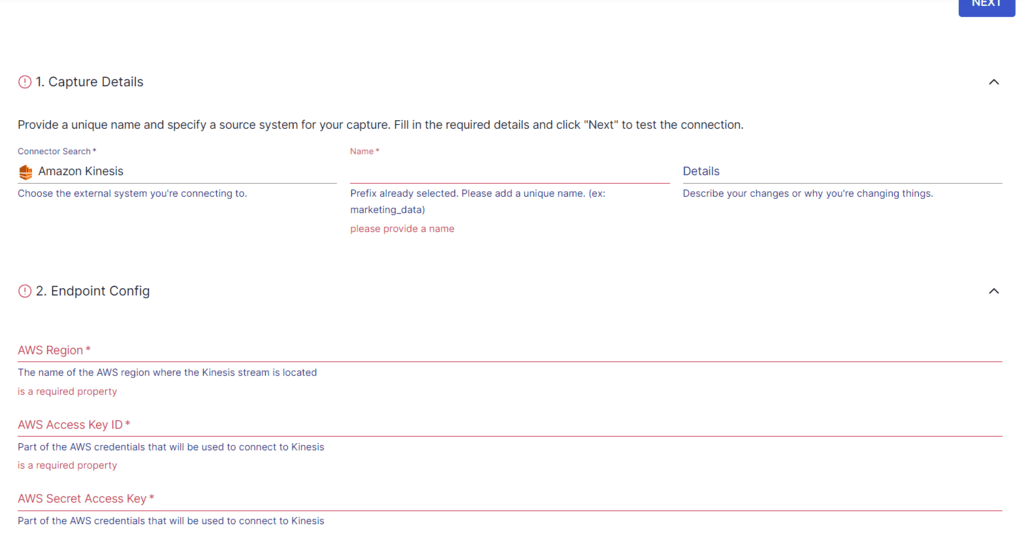
The Create Capture page of the Kinesis connector consists of Capture Details and Endpoint Config details that you must provide. Some of the mandatory fields include a Name for the capture, the AWS Region, Access Key ID, and Secret Access Key. After filling in the required details, click NEXT > SAVE AND PUBLISH.
This will capture data from Amazon Kinesis streams into Flow collections.
Step 2: Configure Snowflake as the Destination
Following a successful capture, a pop-up window displaying the details of the capture will appear. To proceed with the setup of the destination end of the pipeline, click the MATERIALIZE COLLECTIONS button on the pop-up. Alternatively, you can navigate to the Estuary dashboard and click Destinations > + NEW MATERIALIZATION.
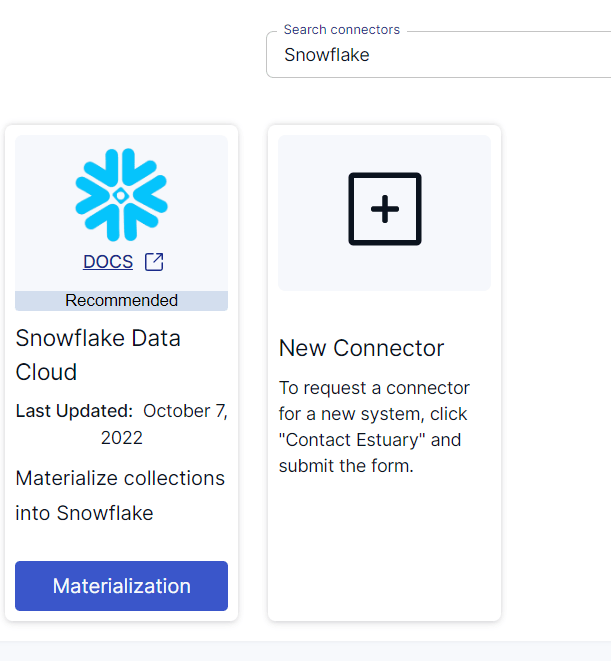
Search for the Snowflake connector using the Search connectors box. The search results will display the Snowflake Data Cloud connector. Click on the Materialization button to proceed.
Note: Before you start configuring the connector, there are a few prerequisites you must meet.
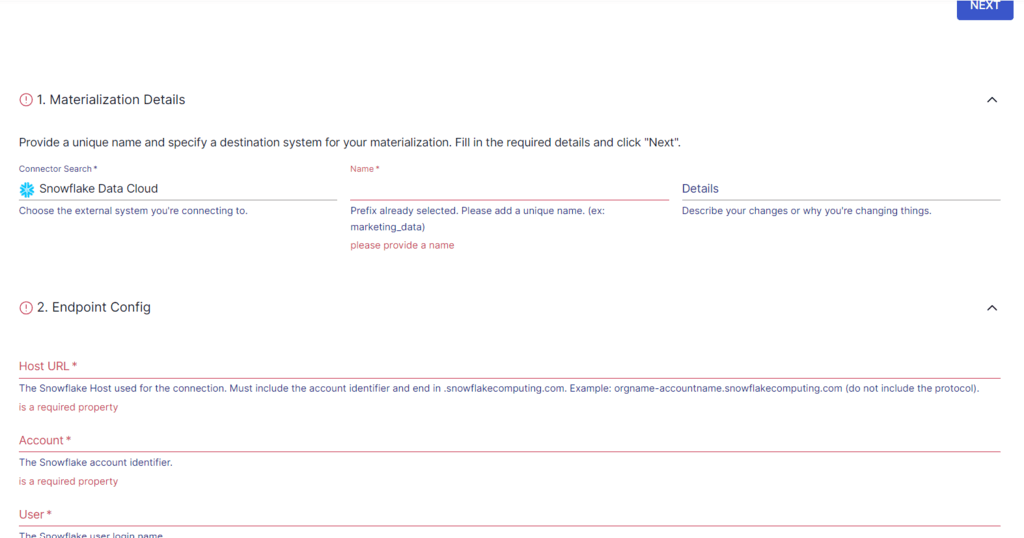
On the Snowflake connector page, there are certain details that you must specify to configure the connector. Some necessary details include a Name for the materialization, Host URL, Account, User, Password, and Database.
In the Source Collections section, you can click on LINK CAPTURE to select a capture to link to your materialization. Any collections added to the capture will automatically get added to your materialization. Alternatively, you can click on the + icon of the COLLECTIONS section to select the Flow collections you want to add to the materialization.
After providing all the required configuration information, click NEXT > SAVE AND PUBLISH. This will materialize Flow collections into tables in a Snowflake database.
For more information on the configuration process of the connectors, refer to the Estuary documentation:
Simplify the data streaming process with Estuary Flow!
In an age where speed matters more than ever before, streaming from Kinesis to Snowflake can benefit your business with real-time data availability for enhanced data-driven decision-making and analytical insights.
When it comes to streaming data, using AWS services like Kinesis Firehose together with Snowflake Snowpipe is a reliable method. However, this method does have several drawbacks, including potential latency and the lack of direct integration between Firehose and Snowflake.
To overcome such challenges, consider using Estuary Flow, which helps simplify the data streaming process, reducing the complexity typically associated with setting up and managing such integrations. Flow also offers enhanced scalability, seamlessly adapting to varying data volumes, which is crucial if your business deals with large and fluctuating datasets.
Get started with Estuary Flow today.
If you enjoyed learning about how to stream data from Kinesis to Snowflake, you may be interested in checking out these related articles for more insights:
1. Streaming data from Kinesis to Redshift
2. 13+ Best Data Streaming PlatformsHappy reading!


